How To DIY Site Search Analytics Using Athena
– Part 3
This is the final post in a series of three. If you missed Part 1 and Part 2, please head over and read them first as this post will build on the work from our sample analytics application.
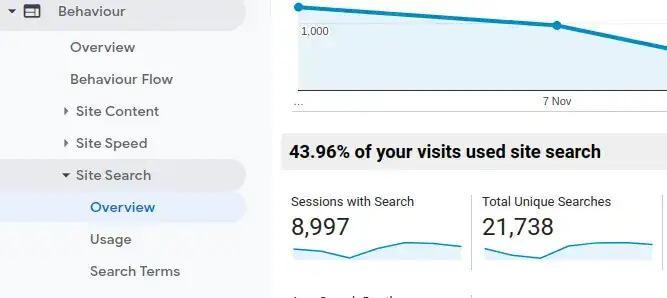
Remember: we are building an Ecommerce Site Search Analytics tool from scratch. The goal is to allow for you to more accurately gather detailed information from your site search tool in order to optimize your business for more online revenue.
So let’s get right to it and discuss how to add the following features to our application:
-
How-To generate random sample data to easily create queries spanning multiple days.
-
How-To create Athena queries to fetch the E-Commerce KPIs: CTR and CR.
-
How-To create an HTML page to visualize the KPIs in a line chart.
1. How-To generate random sample data

So far, our application can process a single CSV file, which it then converts into an Apache Parquet file. This file is then uploaded to AWS S3 under the partition key of the last modification date of that file.
Now, we will create a method to generate random data across multiple days. This enables us to write Athena queries that span a time range. (E.g., get the CTR of the last 7 days.) First, we need to make some necessary changes to the FileController and FileService classes even though this clearly violates the Single-Responsibility-Principle. However, for the purposes of this post, it will serve our needs.
Open up the FileController and add the following method:
					@GetMapping("/randomize/{numDays}")
@ResponseBody
public List<URL> randomize(@PathVariable int numDays) {
    return fileService.createRandomData(numDays);
}
The endpoint expects a path variable containing the number of days the random data should be created. This variable is subsequently passed to a new method in the FileService which contains the actual logic:
					public List<URL> createRandomData(int numberOfDays) {
    List<String> queries = new ArrayList<>(List.of("dress", "shoes", "jeans", "dress red", "jacket", "shoes women", "t-shirt black", "tshirt", "shirt", "hoodie"));
    String rawSchema = getSchemaFromRootDir();
    MessageType schema = MessageTypeParser.parseMessageType(rawSchema);
    LocalDate now = LocalDate.now();
    Random random = new Random();
    AmazonS3 s3 = AmazonS3ClientBuilder.standard().build();
    List<URL> uploadUrls = new ArrayList<>(numberOfDays);
    for (int i = 0; i < numberOfDays; i++) {
        Collections.shuffle(queries);
        Path tempFile = createTempDir().resolve("analytics" + String.valueOf(i) + ".parquet");
        org.apache.hadoop.fs.Path path = new org.apache.hadoop.fs.Path(tempFile.toUri());
        try (
                CsvParquetWriter writer = new CsvParquetWriter(path, schema, false);
        ) {
            for (String query : queries) {
                Integer searches = random.nextInt(100);
                Double ctrBound = 0.3 * searches;
                Integer clicks = ctrBound.intValue() == 0 ? 0 : random.nextInt(ctrBound.intValue());
                Double transactionsBound = 0.1 * searches;
                Integer transactions = transactionsBound.intValue() == 0 ? 0 : random.nextInt(transactionsBound.intValue());
                List<String> values = List.of(query, searches.toString(), clicks.toString(), transactions.toString());
                writer.write(values);
            }
        }
        catch (IOException e) {
            throw new StorageFileNotFoundException("Could not create random data", e);
        }
        String bucket = String.format("search-insights-demo/dt=%s", now.minusDays(i).toString());
        s3.putObject(bucket, "analytics.parquet", tempFile.toFile());
        uploadUrls.add(s3.getUrl(bucket, "analytics.parquet"));
    }
    context.execute(QUERY_REPAIR_TABLE);
    return uploadUrls;
}
					# Create random data for the last seven days
curl -s localhost:8080/csv/randomize/7
# The response returns the S3 URLs for every generated Parquet file
["https://s3.eu-central-1.amazonaws.com/search-insights-demo/dt%3D2021-10-11/analytics.parquet","https://s3.eu-central-1.amazonaws.com/search-insights-demo/dt%3D2021-10-10/analytics.parquet","https://s3.eu-central-1.amazonaws.com/search-insights-demo/dt%3D2021-10-09/analytics.parquet","https://s3.eu-central-1.amazonaws.com/search-insights-demo/dt%3D2021-10-08/analytics.parquet","https://s3.eu-central-1.amazonaws.com/search-insights-demo/dt%3D2021-10-07/analytics.parquet","https://s3.eu-central-1.amazonaws.com/search-insights-demo/dt%3D2021-10-06/analytics.parquet","https://s3.eu-central-1.amazonaws.com/search-insights-demo/dt%3D2021-10-05/analytics.parquet"]
Now that our files are uploaded to S3 let’s check if Athena partitioned the data correctly by executing the count request.
					curl -s localhost:8080/insights/count
# The response should look like
Executing query     : select count(*) from "ANALYTICS"
Fetched result      : +-----+
                    : |count|
                    : +-----+
                    : |  73|
                    : +-----+
Fetched row(s)      : 1
2. How-To create Athena queries to fetch the E-Commerce KPIs: CTR and CR
The Click-Through-Rate (CTR) and Conversion-Rate (CR) are among the most frequently used KPIs when it comes to measuring the performance of an E-Commerce-Search.
Most search vendors claim that their solution boosts your Conversion-Rate by X %
Often the promise is made to increase the CR by upwards of 30%. More than anything, this is clever marketing as the potential increase goes hand in hand with increased sales. However, as highlighted in the blog series by Andreas Wagner it’s necessary to not only rely on these KPIs to optimize search. Nevertheless, they are part of the big picture, so let’s talk about retrieving these KPIs. Technically, if you already have the correct data, the calculation is pretty straightforward.
A Definition of the KPIs CR and CTR:

- CR or Conversion Rate: Number of transactions / Number of searches
- CTR or Click Through Rate: Number of clicks / Number of searches
Now that we know what these KPIs are and how to calculate them, we need to add the new REST endpoints to the AthenaQueryController
					@GetMapping("/ctr")
public ResponseEntity<ChartData> getCTR(@Valid AnalyticsRequest request) {
    return ResponseEntity.ok(queryService.getCTR(request));
}
@GetMapping("/cr")
public ResponseEntity<ChartData> getCR(@Valid AnalyticsRequest request) {
    return ResponseEntity.ok(queryService.getCR(request));
}
The parameter of both methods has two unique features:
- @Valid This annotation is part of the Java Bean Validation specification. It ensures that the fields of the subsequent object (AnalyticsRequest) are validated using their internal annotations. This ensures that inputs made in most cases by a user via a GUI meet specific criteria. In our case, we want the user to enter the period for calculating the CR/CTR, and we want to make sure that the start date is before the end date. We achieve this with another annotation @AssertTrue in the AnalyticsRequest class:
					@Data
@AllArgsConstructor
@NoArgsConstructor
public class AnalyticsRequest {
    @DateTimeFormat(iso = ISO.DATE)
    private LocalDate   from;
    @DateTimeFormat(iso = ISO.DATE)
    private LocalDate   to;
    @AssertTrue
    public boolean isValidDateRange() {
        return from != null && to != null && !to.isBefore(from);
    }
}
The incoming REST request will automatically be validated for us. Additionally, our service method will only be called if the isValidDateRange method returns true otherwise, a validation error response will be sent to the client. If you followed the second part of this article and tried to add those annotations, you will get an error due to missing required dependencies. So let’s go ahead and add them to the pom.xml
					<dependency>
    <groupId>org.springframework.boot</groupId>
    <artifactId>spring-boot-starter-validation</artifactId>
</dependency>
This Spring starter pulls in hibernate-validator, the reference implementation of the validation API. Additionally, jakarta.el, an implementation of the Expression Language specification, which supports variable interpolation as part of the validation API, is also loaded.
- AnalyticsRequest is not preceded by any @RequestParam, @RequestBody or @PathVariable annotation. As a result, Spring tries to map each request parameter to a field in the specified DTO – Data Transfer Object. In order for this to work, the parameter and field name must be identical.
In our case, this means the request must look like this: baseUrl/cr?from=yyyy-MM-dd&to=yyyy-MM-dd
That’s it for the controller.

How-To Make The Necessary Changes to the AthenaQueryService
Let’s dig into the details of the changes in the AthenaQueryService using the example of CR
					public ChartData getCR(AnalyticsRequest request) {
    Field<BigDecimal> crField = saveDiv(sum(ANALYTICS.TRANSACTIONS), sum(ANALYTICS.SEARCHES), new BigDecimal(0));
    return getKPI(request, crField);
}
Very straightforward with the help of two auxiliary methods – where the real magic is at. So let’s examine those auxiliary methods in more detail now.
We begin with saveDiv
					private Field<BigDecimal> saveDiv(AggregateFunction<BigDecimal> dividend, AggregateFunction<BigDecimal> divisor, BigDecimal defaultValue) {
        return coalesce(dividend.cast(DECIMAL.precision(18, 3)).div(nullif(divisor, new BigDecimal(0))), defaultValue);
    }
Here we use several functions of the JOOQ DSL to protect ourselves from division errors. The most infamous, known by every developer, is division by 0. You see, in practice, there is hardly a webshop that tracks all data correctly. As a result, these protective mechanisms are of utmost importance for volatile data such as E-Commerce search tracking.
- coalesce: returns the first value of the list that is non-null.
- nullif: returns null if both expressions are equal otherwise, it returns the first expression.
- div divides the first value by the second.
The second helper method getKPI creates the actual Athena query and extracts it. This allows the query to be reused when calculating the CTR, thanks to JOOQ and its Field abstraction.
					private ChartData getKPI(AnalyticsRequest request, Field<BigDecimal> field) {
    ChartDataBuilder chartDataBuilder = ChartData.builder();
    context.select(ANALYTICS.DT, field)
            .from(ANALYTICS)
            .where(partitionedBetween(request))
            .groupBy(ANALYTICS.DT)
            .orderBy(ANALYTICS.DT.desc())
            .fetch()
            .forEach(rs -> {
                try {
                    chartDataBuilder.label(LocalDate.parse(rs.get(0, String.class)).toString());
                    chartDataBuilder.data(rs.getValue(1, Double.class) * 100);
                }
                catch (DataTypeException | IllegalArgumentException e) {
                    throw new IllegalArgumentException(e);
                }
            });
    return chartDataBuilder.build();
}
The JOOQ DSL should be very easy to read for anyone who understands SQL syntax. First, we select the date, and our aggregation (CR or CTR), grouped and sorted by date. A slight peculiarity is hidden in the where clause where another auxiliary method is used.
					private Condition partitionedBetween(AnalyticsRequest request) {
    Condition condition = DSL.trueCondition();
    if (request.getFrom() != null) {
        condition = condition.and(ANALYTICS.DT.greaterOrEqual(request.getFrom().toString()));
    }
    if (request.getTo() != null) {
        condition = condition.and(ANALYTICS.DT.lessOrEqual(request.getTo().toString()));
    }
    return condition;
}
Here we restrict the result based on the start and end date of our DTO. With the help of the JOOQ DSL trueCondition, we can ensure that our method always returns a Condition object. Even if we do not have a start or end date in our DTO object. This is excluded by the bean validation, but it is common practice to take protective measures in the service class and not rely solely on functions outside of it. In the last part of the method, each data record from the database is converted into the response format using a for-loop.
Let’s complete the AthenaQueryService by adding the missing CTR calculation.
					public ChartData getCTR(AnalyticsRequest request) {
        Field<BigDecimal> ctrField = saveDiv(sum(ANALYTICS.CLICKS), sum(ANALYTICS.SEARCHES), new BigDecimal(0));
        return getKPI(request, ctrField);
    }
That’s it!

We should now be able to start the application and call our new endpoints.
					# GET the CR. Please adjust from and to accordingly
curl -s "localhost:8080/insights/cr?from=2021-10-04&to=2021-10-11"
# GET the CTR. Please adjust from and to accordingly
curl -s "localhost:8080/insights/ctr?from=2021-10-04&to=2021-10-11"
However, instead of the expected response, we get an Internal Server Error. Looking at the Stacktrace you should see:
org.jooq.exception.DataAccessException: SQL [select `ANALYTICS`.`DT`, coalesce((cast(sum(`ANALYTICS`.`TRANSACTIONS`) as decimal(18, 3)) / nullif(sum(`ANALYTICS`.`SEARCHES`), ?)), ?) from `ANALYTICS` where (true and `ANALYTICS`.`DT` >= ? and `ANALYTICS`.`DT` <= ?) group by `ANALYTICS`.`DT` order by `ANALYTICS`.`DT` desc]; [Simba][AthenaJDBC](100071) An error has been thrown from the AWS Athena client. line 1:23: backquoted identifiers are not supported; use double quotes to quote identifiers
So how do we tell JOOQ to use double quotes instead of backquotes for identifiers? In the world of Spring, this is done mainly by declaring a bean, so here too. Open the SearchInsightsDemoApplication class and add the following:
					@Bean
Settings athenaSettings() {
    return new Settings().withRenderQuotedNames(RenderQuotedNames.NEVER);
}
If you try the request again, you will fail once again! This time with:
Caused by: java.sql.SQLException: [Simba][AthenaJDBC](100071) An error has been thrown from the AWS Athena client. SYNTAX_ERROR: line 1:1: Incorrect number of parameters: expected 4 but found 0
This is a tricky one as it’s not immediately clear what’s going wrong here. However, after spending a decent amount of time scanning the Athena and JOOQ documentation, I found that Athenas engine in version 1 and its corresponding JDBC driver do not support Prepared statements.
This behavior changed in version 2 of the Engine as the Docs claim. But I haven’t tested it so far … The fix in our case is to add another JOOQ configuration setting withStatementType. This is how our final bean definition looks:
					@Bean
Settings athenaSettings() {
    return new Settings().withStatementType(StatementType.STATIC_STATEMENT).withRenderQuotedNames(RenderQuotedNames.NEVER);
}
Fingers crossed for our next try, and voila, we have our CR response:
					: +----------+--------+
|DT    |coalesce|
+----------+--------+
|2021-10-11|  0.038|
|2021-10-10|  0.029|
|2021-10-09|  0.015|
|2021-10-08|  0.035|
|2021-10-07|  0.033|
+----------+--------+
|...record(s) truncated...
Fetched row(s)      : 7
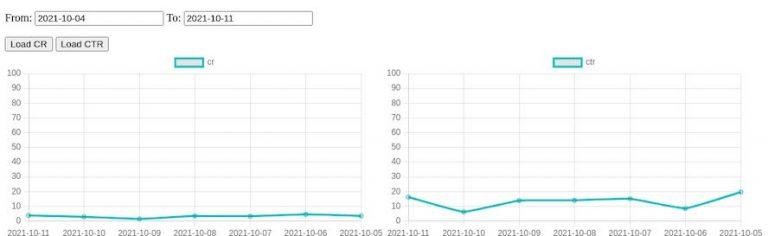
3. How-To create an HTML page to visualize the KPIs in a line chart
The project contains a very minimal frontend that uses Chartjs to render two line charts for CR and CTR. I don’t want to go into detail here; just have a look at the index.html file under src/main/resource/static. Once you start the application, point your browser to http://localhost:8080/ and enter from and to dates in the format yyyy-MM-dd. Afterward, you can press one of the buttons to see the chart rendering
This ends our series on how to develop your own site search analytics that
- Is cost-effective
- Is highly scalable
- Is expandable as it’s self-owned
However, this is only the beginning. For a proper site search analytics tool that you can use to optimize your business, additional KPIs are required. These can be added easily enough if you have the appropriate data.
And that’s a crucial, if not the most important, factor!
Without the RIGHT DATA it’s shit in, shit out!
No matter how good the underlying architecture is, without correct data, an analysis of the search offers no added value. On the contrary, wrong decisions are made from wrong data, which leads to a direct loss of sales in the worst-case scenario. If you want to minimize the risk of bad data, try tackling E-Commerce search tracking yourself and use an open-source solution such as the Search Collector. But please keep in mind that these solutions only provide the framework for tracking data. If used incorrectly, they cause the same problems as commercial solutions.
Do Ecommerce Site Search analytics, but do it properly or not at all!
The final source code can be found on github.